
Reading Time: 5 minutes
This is part two in a mini-series – Testing in Real Life – that aims to share practical information about testing, based on real life examples. It’s born from the observation that a lot of resources I’ve seen appear to concentrate mostly on theory, or how to advance existing experience, but there’s not a lot about how to actually do these things in real life, or get started with them. The information I’ll share in this mini-series is based on my recent experience of helping someone test their mobile app for the first time, as an example of how to test in real life.
In this post, I’ll give some practical tips on how to document exploratory testing with session-based test management (SBTM) reports. You can read more posts about SBTM.
The Short Version
Here are the most important points to note about documenting exploratory testing:
- Include details of everything you tested (the experiments you did) and the results (the information you uncovered)
- Make the reports easily available to everyone on the project
- Adapt the structure and content of your reports to suit the project’s needs
The Long Version
This post assumes that you already have some knowledge, and perhaps experience, of exploratory testing and SBTM. I won’t attempt to rehash an explanation here, and instead point you to an article about SBTM from one of the creators. If you don’t already know a bit about SBTM, I encourage you to read at least that before continuing.
Test Notes
Level of Detail
The first time I tried SBTM, I had a lot of questions about how to do it “properly”. I had some weird idea about how to challenge myself to try something new, which resulted in me doubting myself and what I already knew to work well for me.
Now, having used exploratory testing with SBTM on a number of work and non-work related projects since, I’m a lot more comfortable and sure of what to do: document everything, at a level of detail that makes sense for the project.
Uh… What does that mean? Well, when I initially tried to apply some sort of filter to my session reports to keep them as concise and relevant as possible, I totally left out details of tests that returned expected or acceptable results, and only documented things that were wrong or questionable. The other information I uncovered, which was still valuable information, went completely undocumented and was, for all intents and purposes, lost. Uncovering information without sharing it is almost as useless as not uncovering it at all, so information that isn’t necessarily bad is still worth recording.
A better approach to filtering is to pay attention to how much detail you include about each information point, not how many information points you include. We’re not writing prescriptive test cases, afterall; we’re recording the results of our exploration.
For example, instead of writing, “I clicked this, then this, then this, then this… then this went wrong,” try, “I followed this known workflow, but I chose this instead of that, then this happened”. If you find a bug, you can write the full steps to recreate in the bug report and link the two together. You don’t need the same level of detail in both. Or, as I did for bugs in the app I tested in real life, you can describe the bug only in the bug report, and link that bug directly in your session reports, without any other details. If you write good bug summaries / names, then seeing only this information in the session report should be enough to give readers an idea of what you uncovered without detailing everything within.
Reporting Structure
When it comes to structuring test notes, I still love using Simon Tomes’ PQIP method, but I change and add things here and there to suit the kind of notes I need to record, such as obstacles and constraints, oracles, etc.
In my post about PQIP, I talked about wanting to try out other note taking structures as well, to get some different experiences and try to avoid bias. However, the PQIP method works so well for me as a base, that just adding my own adjustments as and how I need to works tremendously well, and I haven’t found a need to look for something else. I definitely recommend trying it and adapting it to suit your own needs.
Visuals, and Results Summary
Unless what I’m testing is super basic or the scope is deliberately narrow, I write a lot, a lot of notes. Really, a lot of notes. This can be a problem if you want other people to read your session reports and benefit from the information there. They won’t read your reports if they’re too long and time-consuming.
Having well structured notes with headings such as those in PQIP (problems, questions, ideas, praise) really helps with that, but visuals and a results summary at the top of session reports are more helpful still. I use simple icons in whatever note-taking tool I’m using to highlight each note type, and put that icon next to each heading, so people can easily identify and jump to the section they’re interested in. For example, red crosses for bugs, lightbulbs for ideas, an info icon for observations, etc. I total the number of each and put that information in the summary at the top of the report, so that anyone reading it can easily see how many of each were uncovered during the session and scroll down to find more information about the points they’re interested in, with the same visuals as used in the summary. If someone is less interested in a particular note type, they can quickly identify it by its icon and skip it.
Here’s an example of a results summary with icons, from a test session I did in real life:
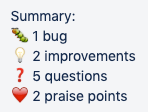
The exact icons used vary from tool to tool, but the idea and effect are the same.
Reporting Tools
Speaking of tools, a question I’m often asked is which tool to use for session reporting. It doesn’t fucking matter! What does matter is that the reports are openly available to everyone on the project, without having to do a lot of searching.
In the past, I’ve used Jira comments, Confluence pages… I even tried Evernote, which I actually really don’t like, but others love it. It depends on what works, both for you and the other people on your project.
For the app I talk about in this series, we used Trello to track work, so I just added my session reports as comments on the relevant cards.
Like with a lot of other highly debated topics, the tools you use are amongst some of the least important things. You should worry about getting the mindset and techniques right first, because the tools won’t do that for you. If you don’t have the mindset and techniques figured out, tools won’t help you either.
Flexibility
Maybe you’ve noticed a theme throughout this post about adapting and changing things here and there, depending on context. I can’t stress enough the importance of taking your project context into account and being able to adapt to its individual needs. Like with any technique, solution, or whatever, things will rarely work perfectly out of the box for everyone who tries it. They need to be adjusted slightly, customised, because what works for one project or context might not work for another.
That’s real life. And that’s probably the most general, yet valuable advice I can give, not only to those seeking to be modern testers, but in life in general. Don’t implement everything I, or anyone else, talks about and expect it to work perfectly for you. Try it out, experiment, and don’t be afraid to do your own thing.
Part three of the mini-series will explore some interesting bugs that I found in a seemingly boring place – a keyboard. Read part three of Testing in Real Life.
One thought to “How to Document Testing with SBTM: Testing IRL Part 2”